使用 CloudFlare D1 在Nuxt中自定义评论功能
这一篇比较流水账,因为前面两篇知道了概念和流程,所以这里其实就是再复制一遍操作而已。
第一步-在 Nuxt 项目中写入 cloudflare 相关代码
这里就是跟之前的一样,不过之前的是安装官网文档,直接新开的仓库写的。而我们这里是需要在 Nuxt 项目中集成,不过也是跟之前的代码一样啦。
1. 安装依赖
pnpm i -D @cloudflare/vitest-pool-workers @cloudflare/workers-types wrangler drizzle-kit drizzle-orm hono @libsql/client
2. 写入 db 代码和 worker 代码
这里的代码都是从上一篇的代码中复制过来的。
worker 代码:
          import type { D1Database } from '@cloudflare/workers-types'
import type { Comment } from './db/schema'
import { eq } from 'drizzle-orm'
import { Hono } from 'hono'
import { createDb } from './db'
import { comments } from './db/schema'

const app = new Hono<{ Bindings: { DB: D1Database } }>()

interface CreateCommentBody {
  content: string
  author: string
  email: string
  postId: string
  parentId?: number
}

app.get('/', (c) => {
  return c.json({ message: 'Hello World' })
})

// 创建评论
app.post('/comments', async (c) => {
  const db = createDb(c.env.DB)
  const body = await c.req.json<CreateCommentBody>()

  const ip = c.req.header('cf-connecting-ip')
    || c.req.header('x-forwarded-for')
    || 'unknown'

  const newComment = await db.insert(comments).values({
    content: body.content,
    author: body.author,
    email: body.email,
    postId: body.postId,
    ip,
    parentId: body.parentId || null,
  }).returning()

  return c.json(newComment[0])
})

interface CommentWithReplies extends Comment {
  replies: CommentWithReplies[]
}

// 获取评论列表(树状结构)
app.get('/comments', async (c) => {
  const db = createDb(c.env.DB)

  const allComments = await db
    .select()
    .from(comments)
    .orderBy(comments.createdAt)

  // 构建评论树
  const commentMap = new Map<number, CommentWithReplies>()
  const rootComments: CommentWithReplies[] = []

  allComments.forEach((comment) => {
    commentMap.set(comment.id, { ...comment, replies: [] })
  })

  allComments.forEach((comment) => {
    if (comment.parentId) {
      const parentComment = commentMap.get(comment.parentId)
      if (parentComment) {
        parentComment.replies.push(commentMap.get(comment.id)!)
      }
    }
    else {
      rootComments.push(commentMap.get(comment.id)!)
    }
  })

  return c.json(rootComments)
})

// 更新评论
app.patch('/comments/:id', async (c) => {
  const db = createDb(c.env.DB)
  const id = Number(c.req.param('id'))
  const { content } = await c.req.json<{ content: string }>()

  const updatedComment = await db.update(comments)
    .set({
      content,
      updatedAt: new Date().toISOString(),
    })
    .where(eq(comments.id, id))
    .returning()

  return c.json((updatedComment)[0])
})

// 删除评论
app.delete('/comments/:id', async (c) => {
  const db = createDb(c.env.DB)
  const id = Number(c.req.param('id'))

  await db.delete(comments)
    .where(eq(comments.id, id))

  return c.json({ success: true })
})

// 获取特定文章的评论列表
app.get('/posts/:postId/comments', async (c) => {
  const db = createDb(c.env.DB)
  const postId = c.req.param('postId')

  const allComments = await db
    .select()
    .from(comments)
    .where(eq(comments.postId, postId))
    .orderBy(comments.createdAt)

  // 构建评论树
  const commentMap = new Map<number, CommentWithReplies>()
  const rootComments: CommentWithReplies[] = []

  allComments.forEach((comment) => {
    commentMap.set(comment.id, { ...comment, replies: [] })
  })

  allComments.forEach((comment) => {
    if (comment.parentId) {
      const parentComment = commentMap.get(comment.parentId)
      if (parentComment) {
        parentComment.replies.push(commentMap.get(comment.id)!)
      }
    }
    else {
      rootComments.push(commentMap.get(comment.id)!)
    }
  })

  return c.json(rootComments)
})

export default app
db代码表结构:
          import type { AnySQLiteColumn } from 'drizzle-orm/sqlite-core'
import { sql } from 'drizzle-orm'
import { integer, sqliteTable, text } from 'drizzle-orm/sqlite-core'

// 定义表结构
export const comments = sqliteTable('comments', {
  id: integer('id').primaryKey({ autoIncrement: true }),
  content: text('content').notNull(),
  author: text('author').notNull(),
  email: text('email').notNull(),
  ip: text('ip').notNull(),
  postId: text('post_id').notNull(),
  parentId: integer('parent_id').references((): AnySQLiteColumn => comments.id),
  likes: integer('likes').default(0).notNull(),
  createdAt: text('created_at')
    .default(sql`CURRENT_TIMESTAMP`)
    .notNull(),
  updatedAt: text('updated_at')
    .default(sql`CURRENT_TIMESTAMP`)
    .notNull(),
})

// 导出类型
export type Comment = typeof comments.$inferSelect
export type NewComment = typeof comments.$inferInsert
drizzle 连接方法,用于 worker 中:
          import type { D1Database } from '@cloudflare/workers-types'
import { drizzle } from 'drizzle-orm/d1'
import * as schema from './schema'

export function createDb(d1: D1Database) {
  return drizzle(d1, { schema })
}

export type DbType = ReturnType<typeof createDb>
3. 配置 drizzle
为了找到目录生成迁移文件。
          import type { Config } from 'drizzle-kit'

export default {
  schema: './cloudflare-d1/db/schema.ts',
  out: './migrations',
  driver: 'd1-http',
  dialect: 'sqlite',
} satisfies Config
4. 写入 wrangler.toml 配置
          #:schema node_modules/wrangler/config-schema.json
name = "comments-api"
main = "cloudflare-d1/index.ts"
compatibility_date = "2024-01-15"

[observability]
enabled = true

[[d1_databases]]
binding = "DB"
database_name = "postly"
database_id = "${CLOUDFLARE_D1_DATABASE_ID}"
5. 写入 worker-configuration.d.ts 文件
          import type { D1Database } from '@cloudflare/workers-types'

interface Env {
  DB: D1Database
}
6. 写入 .env 文件
CLOUDFLARE_D1_DATABASE_ID=your-database-id
7. 写入 package.json
          "scripts": {
  "db:gen": "drizzle-kit generate",
    "db:push": "npm run db:reset && npm run migrate:local",
    "db:migrate:local": "wrangler d1 migrations apply postly --local",
    "db:migrate:remote": "wrangler d1 migrations apply postly --remote",
    "db:reset": "wrangler d1 execute postly --local --command 'DROP TABLE IF EXISTS comments;'",
    "db:dev": "wrangler dev",
    "db:deploy": "wrangler deploy"
}
综上,我们就已经在 Nuxt 项目中写入了 cloudflare d1 相关代码。下面就可以开始调试了。
          # 生成迁移文件
npm run db:gen

# 本地调试
npm run db:dev

# 部署
npm run db:deploy
第二步-再一步修改
这一步修改,是为了能在项目中方便使用。
- 定义 dto
- 使用 zod 进行数据验证
- 修改接口请求和响应拦截器
- 统一管理 api 请求
其余几项应该都很好理解,项目中统一维护 api 请求会方便很多。
不过现在还有一个 dto ,一个 zod,这两个概念可以简单说一下。
dto 是 data transfer object 的缩写,翻译过来就是数据传输对象。我们虽然定义了表结构,但是前端可能需要的格式千奇百怪,不可能直接将数据库表中的数据全量返回就能用了,需要组装,所以 dto 就是用来组装数据的。
而数据库既然定义好了字段,但是类型都是 text 、 integer 等,针对我想塞邮件格式,或者想塞 ip 格式,这些格式的校验,那么就是需要 zod 来了。
1. 定义 dto 并且使用 zod 进行数据验证
          import { z } from 'zod'

// 创建评论的基础验证模式
const CommentBaseSchema = z.object({
  content: z.string()
    .min(1, '评论内容不能为空')
    .max(1000, '评论内容不能超过1000字'),
  author: z.string()
    .min(2, '昵称至少需要2个字符')
    .max(50, '昵称不能超过50个字符'),
  email: z.string()
    .email('请输入有效的邮箱地址'),
  postId: z.string()
    .min(1, '文章ID不能为空'),
})
2. worker 接口响应包一层统一响应结构
          interface ResponseBody<T = any> {
  data: T
  code: number
  message: string
}
3. 前端统一封装接口拦截
在 app/service/request/index.ts 中,统一封装接口拦截,这样在项目中使用接口的时候,就可以直接使用 useAPI 方法了。
          import type { UseFetchOptions } from 'nuxt/app'

export function useAPI<T>(
  url: string | (() => string),
  options?: UseFetchOptions<T>,
) {
  const config = useRuntimeConfig()
  const baseURL = config.public.BASE_URL

  return useFetch(`${baseURL}${url}`, {
    ...options,
    $fetch: useNuxtApp().$api as typeof $fetch,
  })
}
4. 统一接口请求管理
在 app/service/api/index.ts 中,统一管理接口请求。
在定义之前,先定义一下接口的返回结构:
          export interface ApiResponse<T = any> {
  data: T
  code: number
  message: string
}
然后定义接口请求:
          import type { CommentResponseDto, CreateCommentDto } from '~~/cloudflare-d1/db/dto/comment.dto'
import type { ApiResponse } from '~/service/request/response'
import { useAPI } from '~/service/request'

/**
 * 1. 获取评论列表
 * @param postId 文章ID
 */
export function getCommentsByPostId(postId: string) {
  return useAPI<ApiResponse<CommentResponseDto>>(`/posts/getCommentsByPostId/${postId}`, {
    method: 'GET',
    query: { postId },
  })
}

/**
 * 2. 创建评论
 * @param data 评论数据
 */
export function createCommentApi(data: CreateCommentDto) {
  return useAPI<ApiResponse<CommentResponseDto>>('/comments', {
    method: 'POST',
    body: data,
  })
}
5. 接口请求响应拦截器
在 plugins/api.ts 中,添加接口请求响应拦截器。
这里其实就是配置一个 baseURL ,因为我们在项目中,有可能会遇到后端微服务,或者我们去调用多个第三方接口,所以这里配置一个 baseURL ,方便我们统一扩展管理。具体接口的调用,是在定义的一个 plugins 中,当然这个插件可以不用定义,可以直接 import 引入使用也行,因为只在客户端使用。
          import type { UseFetchOptions } from 'nuxt/app'

export function useAPI<T>(
  url: string | (() => string),
  options?: UseFetchOptions<T>,
) {
  const config = useRuntimeConfig()
  const baseURL = config.public.NUXT_PUBLIC_BASE_URL
  const nuxtApp = useNuxtApp()

  return nuxtApp.$api<T>(`${baseURL}${url}`, options as any)
}
定义的插件,用于拦截请求和响应:
          /* eslint-disable unused-imports/no-unused-vars */
export default defineNuxtPlugin((nuxtApp) => {
  const api = $fetch.create({
    onRequest({ request, options }) {
      options.headers.set('Custom', '666')
    },

    async onResponse({ request, response, options }) {
      // 在这里添加您的响应拦截逻辑
    },

    async onResponseError({ request, response, options }) {
      if (response.status === 401) {
        // 处理认证错误
      }
    },
  })

  return {
    provide: {
      api,
    },
  }
})
上一步定义的插件,在 nuxt.config.ts 中引入:
          export default defineNuxtConfig({
  plugins: [
    { src: '~~/plugins/api.client.ts', mode: 'client' },
  ],
})
当然,上面我们定义了 Custom ,所以这里在请求头中,会添加一个 Custom 的请求头。而要想能访问到数据,后端接口中也需要定义允许这个请求头。
          import type { Hono } from 'hono'
import { cors } from 'hono/cors'

export function routeConfig(app: Hono<any>) {
  app.use('/*', cors({
    origin: '*', // 或者指定具体域名
    allowHeaders: ['Custom', 'Content-Type'], // 允许的请求头
    allowMethods: ['GET', 'POST', 'PUT', 'DELETE', 'PATCH', 'OPTIONS'], // 允许的请求方法
    exposeHeaders: ['Content-Length', 'X-Requested-With'],
    maxAge: 86400,
    credentials: true,
  }))
}
在 worker 中,引入这个配置:
          import { routeConfig } from './route.config'

const app = new Hono<{ Bindings: { DB: D1Database } }>()

/** 路由配置 */
routeConfig(app)
6. 使用接口
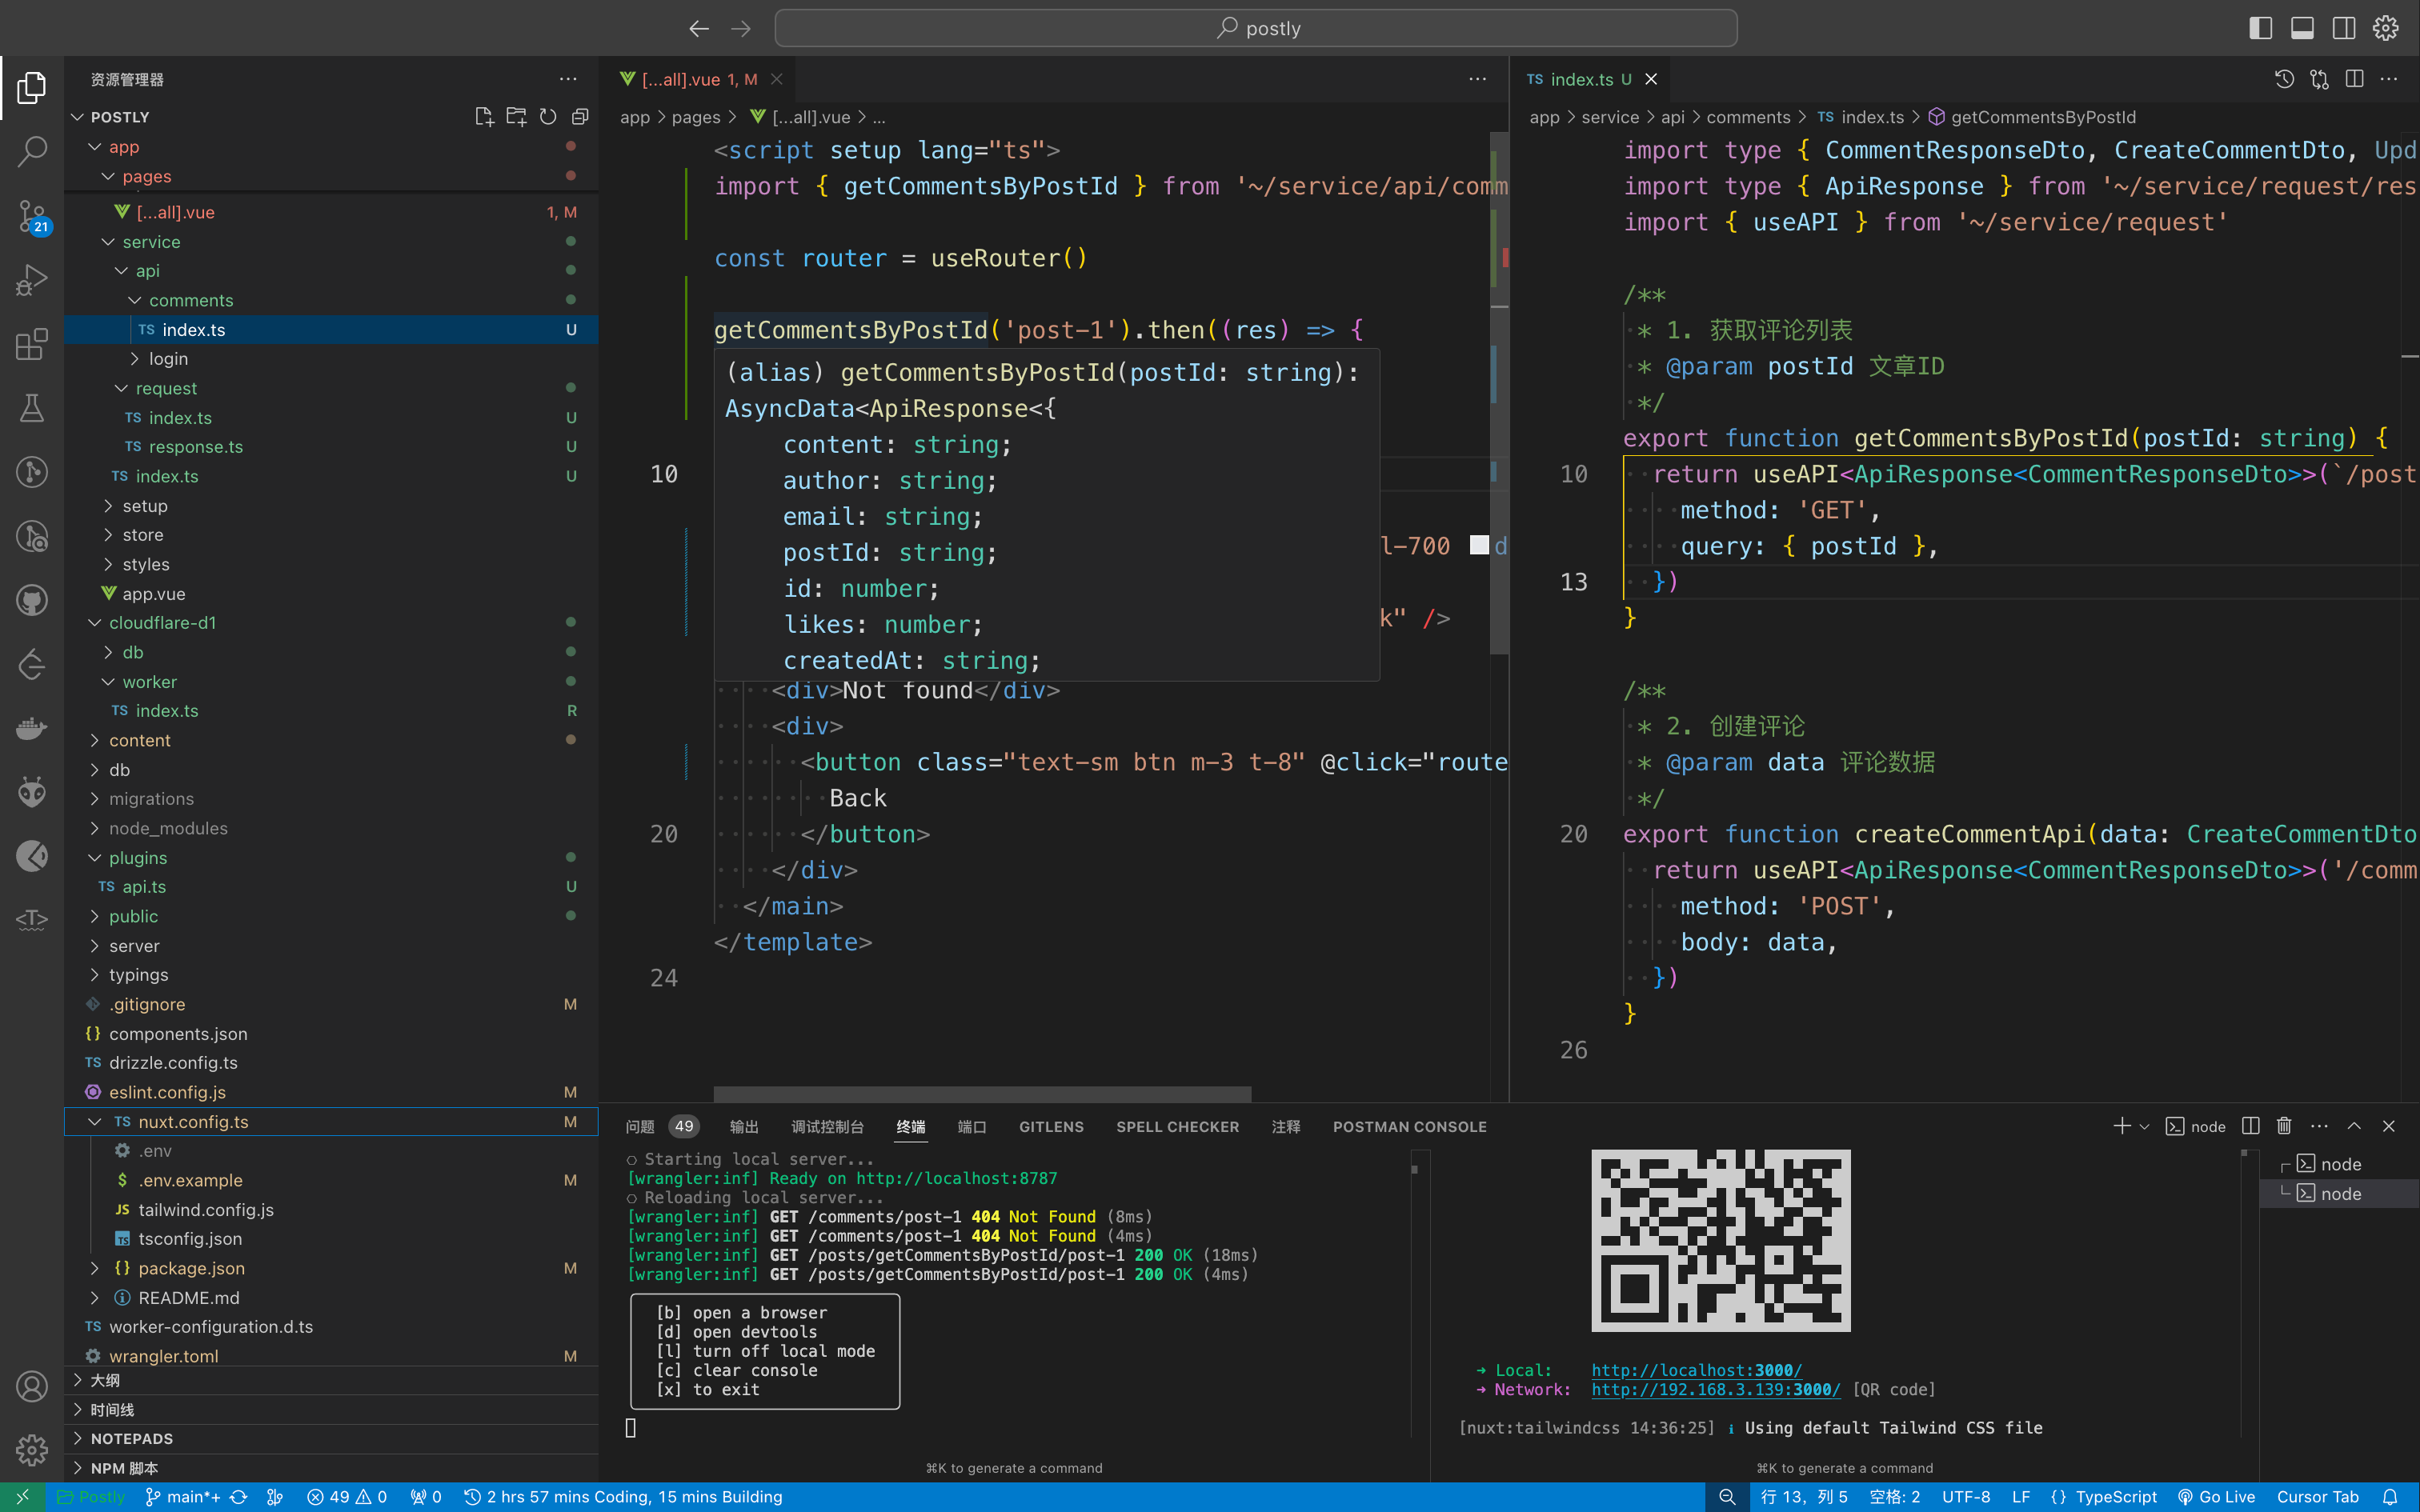
在 app/pages/...all.vue 中,使用接口请求。
import { getCommentsByPostId } from '~/service/api/comments'
const router = useRouter()
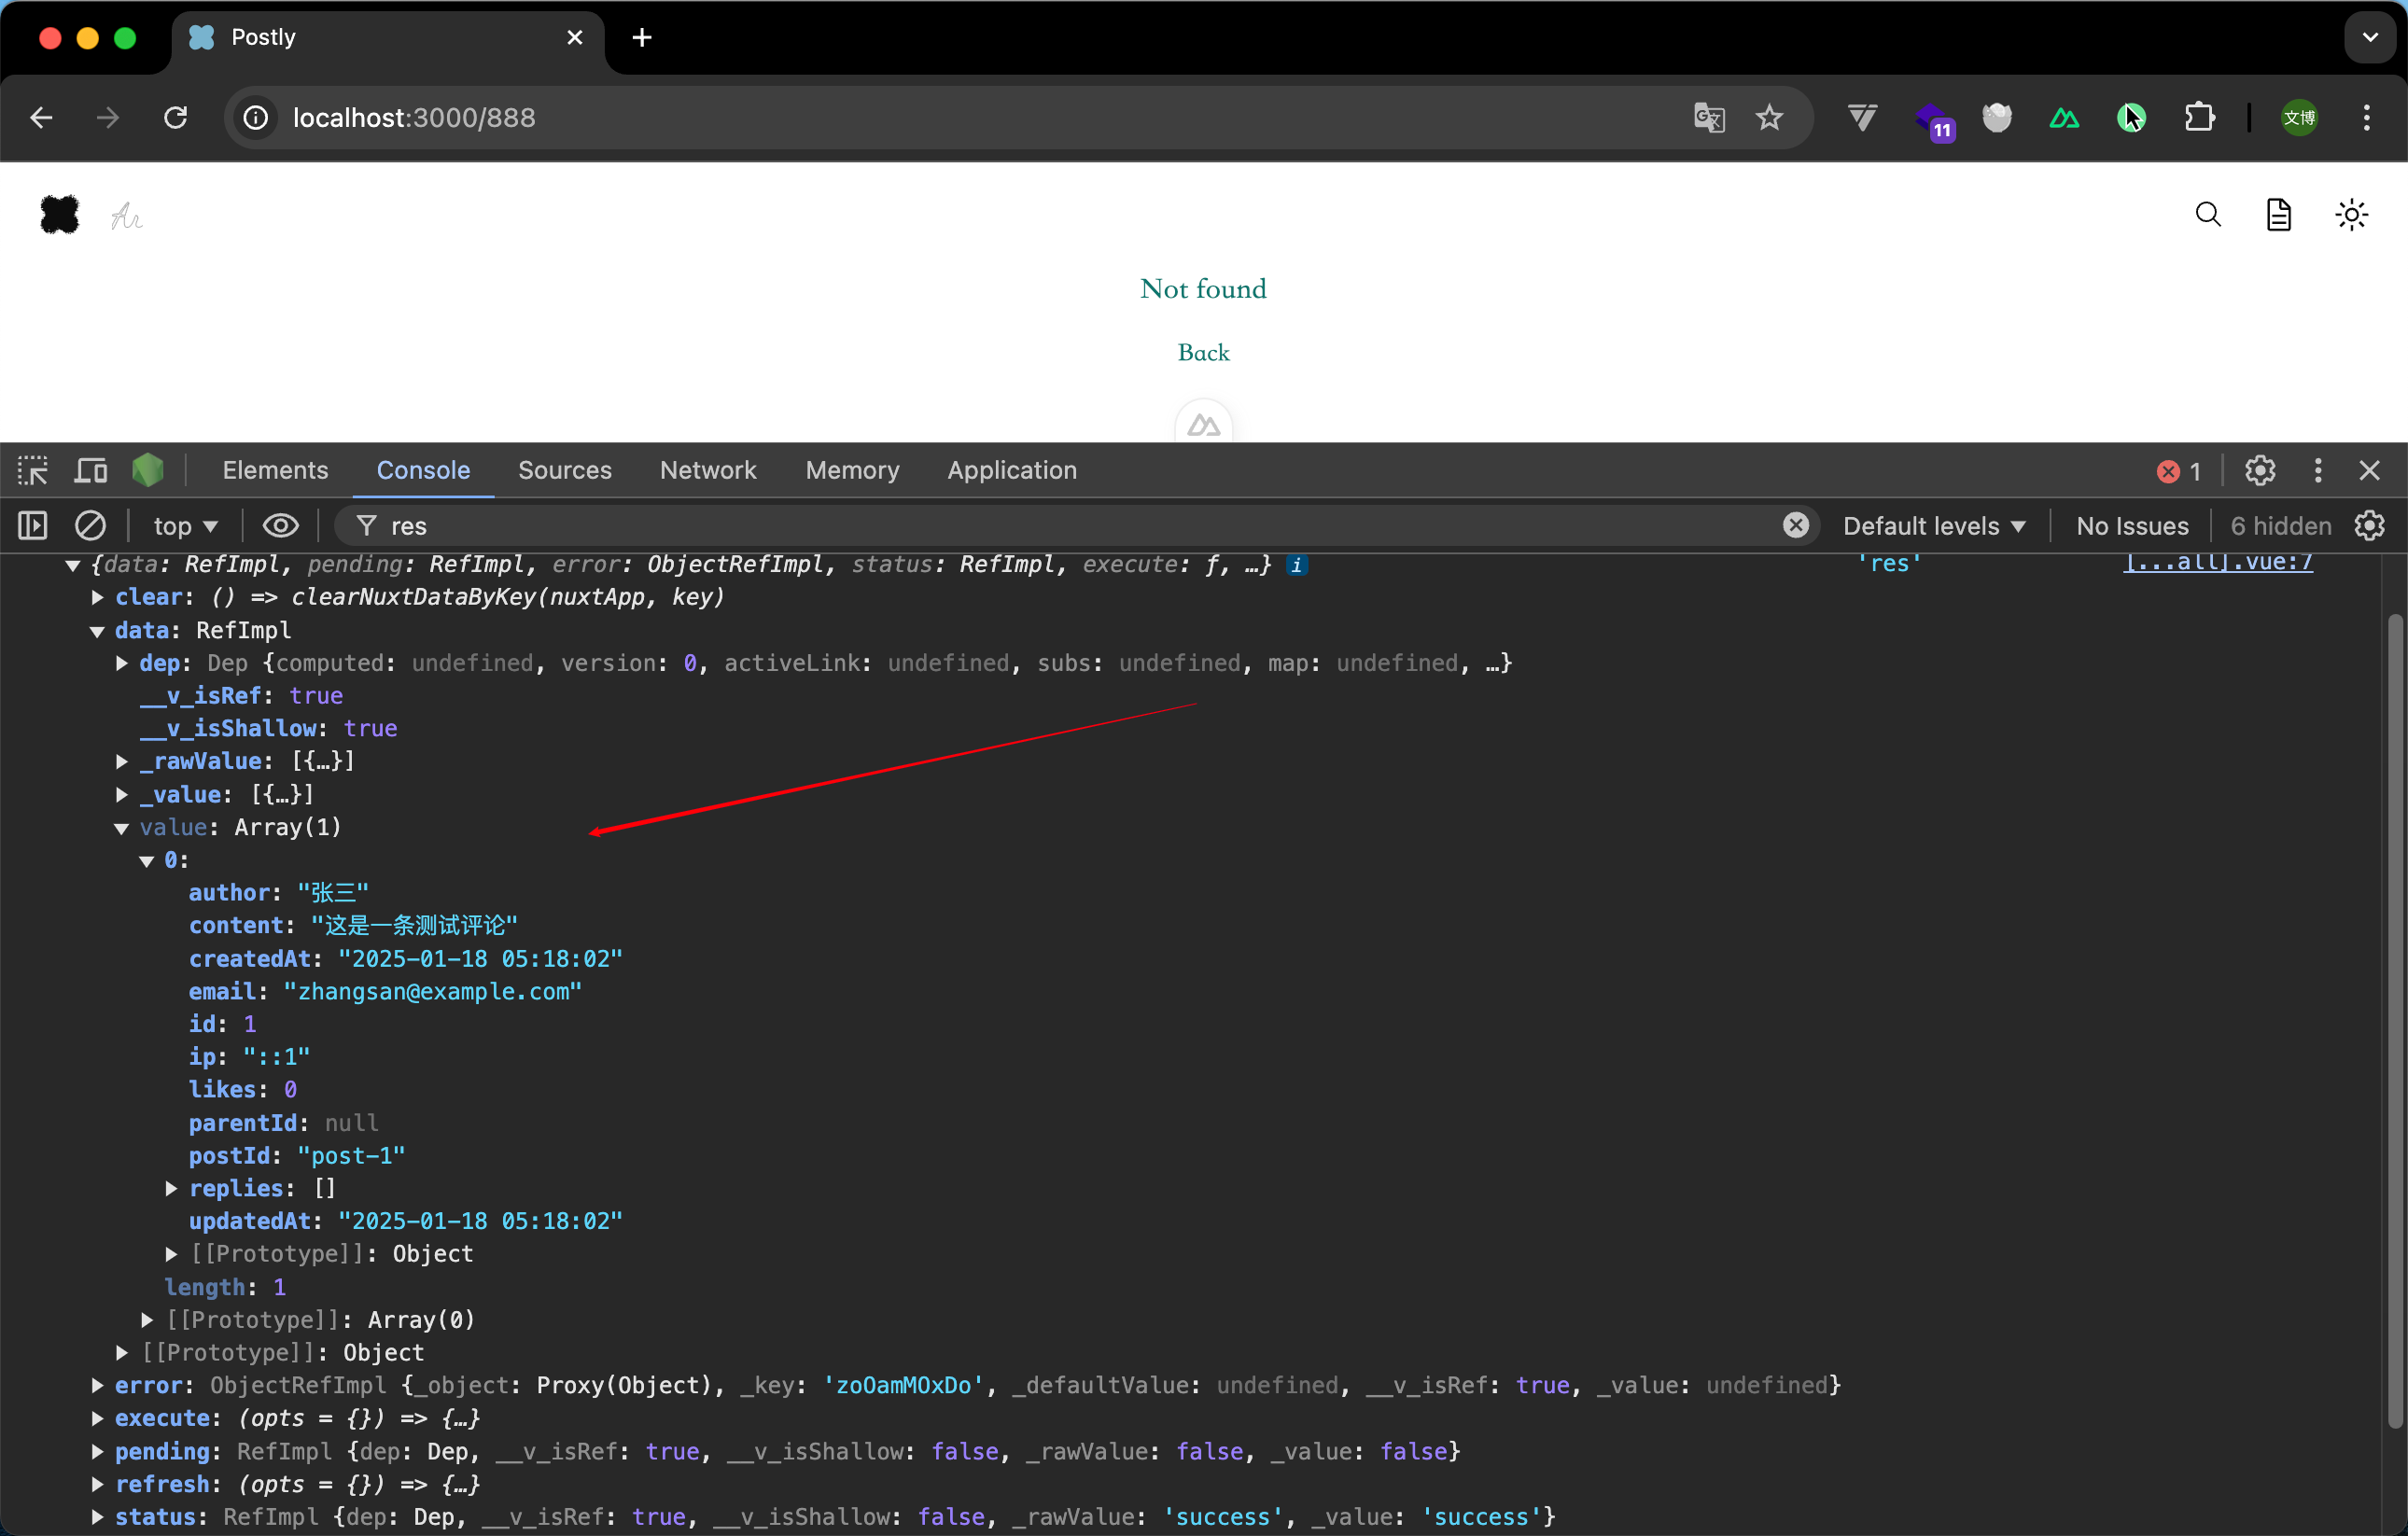
getCommentsByPostId('post-1').then((res) => {
console.log(res, 'res')
})
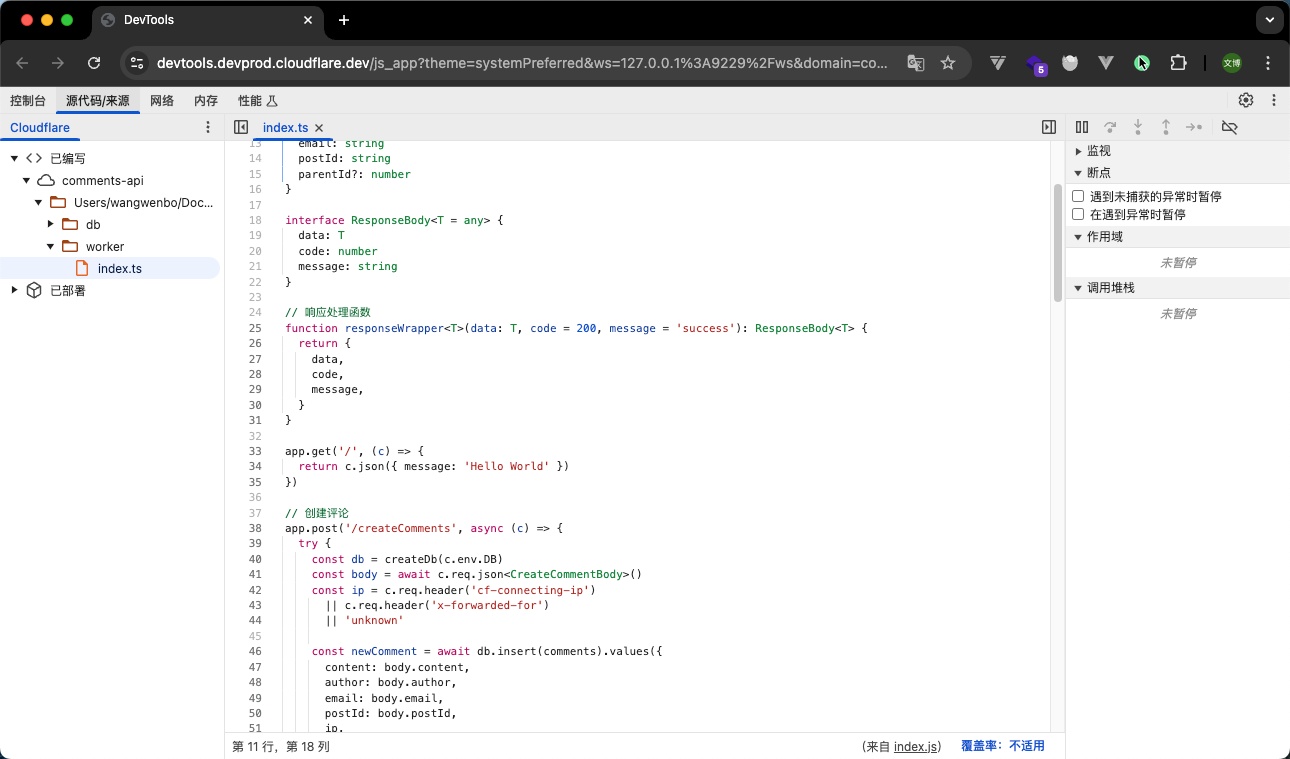
7. debugger worker
启动 wrangler 后,终端会显示,按 d 键,可以进入调试模式。
会打开一个 chrome devtools 的页面,可以进行调试。
第三步-在项目中使用
这里是前端页面展示,不过上面既然都已经定义好了数据结构,其实这里就很简单了。
接口响应结构:
          {
    "code": 200,
    "message": "success",
    "data": [
        {
            "id": 3,
            "content": "测试第一个评论",
            "author": "测试",
            "email": "[email protected]",
            "ip": "47.91.31.60",
            "postId": "content:post:2025:5-使用 CloudFlare D1 和 Hono.js 和 Drizzle ORM 构建评论系统.md",
            "parentId": null,
            "likes": 0,
            "createdAt": "2025-01-23 08:21:28",
            "updatedAt": "2025-01-23 08:21:28",
            "level": 1,
            "replies": [
                {
                    "id": 4,
                    "content": "回复第一个评论",
                    "author": "测试",
                    "email": "[email protected]",
                    "ip": "47.91.31.60",
                    "postId": "content:post:2025:5-使用 CloudFlare D1 和 Hono.js 和 Drizzle ORM 构建评论系统.md",
                    "parentId": 3,
                    "likes": 0,
                    "createdAt": "2025-01-23 08:21:44",
                    "updatedAt": "2025-01-23 08:21:44",
                    "level": 2,
                    "replyTo": {
                        "author": "测试",
                        "email": "[email protected]",
                        "ip": "47.91.31.60"
                    }
                },
                {
                    "id": 5,
                    "content": "再回复第一个评论的第一个评论",
                    "author": "测试",
                    "email": "[email protected]",
                    "ip": "47.91.31.60",
                    "postId": "content:post:2025:5-使用 CloudFlare D1 和 Hono.js 和 Drizzle ORM 构建评论系统.md",
                    "parentId": 4,
                    "likes": 0,
                    "createdAt": "2025-01-23 08:22:42",
                    "updatedAt": "2025-01-23 08:22:42",
                    "level": 2,
                    "replyTo": {
                        "author": "测试",
                        "email": "[email protected]",
                        "ip": "47.91.31.60"
                    }
                }
            ]
        }
    ]
}
前端页面组件可以分为三个部分:
- 评论列表
- 单个列表项
- 添加评论
直接贴代码了,很简单,因为没有啥逻辑,单纯的添加就能调用接口。 后续会添加 GitHub 登录,浏览器指纹登录,匿名登录,以及点赞功能。
列表:
          <script setup lang="ts">
import type { CommentResponseDto } from '~~/cloudflare-d1/db/dto/comment.dto'
import { getCommentsByPostId } from '~/service/api/comments'

const props = defineProps<{
  postId: string
}>()

const comments = ref<CommentResponseDto[]>([])
const loading = ref(false)

// 获取评论列表
async function fetchComments() {
  loading.value = true
  try {
    const { data } = await getCommentsByPostId(props.postId)
    comments.value = data
  }
  catch (error) {
    console.error('获取评论失败:', error)
  }
  finally {
    loading.value = false
  }
}

onMounted(async () => {
  fetchComments()
})
</script>

<template>
  <div
    aria-label="comment-list"
    class="text-start "
  >
    <div>
      <h3 class="text-xl text-center font-bold my-4 tracking-wide">
        欢迎一起交流~
      </h3>
    </div>

    <!-- 评论输入框 -->
    <CommentEditor
      :post-id="postId"
      @success="fetchComments"
    />

    <div class="h-12" />

    <!-- 评论列表 -->
    <div v-if="!loading" class="space-y-6">
      <template v-if="comments.length">
        <div
          v-for="comment in comments"
          :key="comment.id"
          class="comment-thread"
        >
          <!-- 根评论 -->
          <CommentItem
            :comment="comment"
            @refresh="fetchComments"
          />

          <!-- 回复列表 -->
          <div v-if="comment.replies?.length" class="ml-8 space-y-4 mt-4">
            <CommentItem
              v-for="reply in comment.replies"
              :key="reply.id"
              :comment="reply"
              @refresh="fetchComments"
            />
          </div>
        </div>
      </template>
      <div v-else class="text-center text-gray-500 dark:text-gray-400">
        暂无评论,来说两句吧~
      </div>
    </div>

    <div
      v-else
      class="flex justify-center"
    >
      <Loading />
    </div>
  </div>
</template>
添加:
          <script setup lang="ts">
import type { CreateCommentDto } from '~~/cloudflare-d1/db/dto/comment.dto'
import { createCommentApi } from '~/service'

const props = defineProps<{
  postId: string
  parentId?: number
  replyTo?: string
}>()

const emit = defineEmits<{
  success: []
}>()

const form = ref<CreateCommentDto>({
  content: props.replyTo ? `@${props.replyTo} ` : '',
  author: '',
  email: '',
  postId: props.postId,
  parentId: props.parentId,
})

const submitting = ref(false)

async function handleSubmit() {
  if (submitting.value)
    return

  submitting.value = true
  try {
    await createCommentApi(form.value)
    form.value.content = props.replyTo ? `@${props.replyTo} ` : ''
    emit('success')
  }
  finally {
    submitting.value = false
  }
}
</script>

<template>
  <form class="comment-editor mt-4" @submit.prevent="handleSubmit">
    <div class="grid grid-cols-1 gap-4 mb-4 md:grid-cols-2">
      <div>
        <input
          v-model="form.author"
          type="text"
          required
          class="
            w-full px-3 py-2
            border rounded-md
            dark:bg-gray-800
            dark:border-gray-700
          "
          placeholder="昵称 *"
        >
      </div>
      <div>
        <input
          v-model="form.email"
          type="email"
          required
          class="
            w-full px-3 py-2
            border rounded-md
            dark:bg-gray-800
            dark:border-gray-700
          "
          placeholder="邮箱 *"
        >
      </div>
    </div>

    <div class="mb-4">
      <textarea
        v-model="form.content"
        required
        rows="3"
        class="w-full px-3 py-2 border rounded-md dark:bg-gray-800 dark:border-gray-700"
        placeholder="来一发评论吧~ (。・ω・。)"
      />
    </div>

    <button
      type="submit"
      class="px-4 py-2 bg-blue-500 text-white rounded-md hover:bg-blue-600 disabled:opacity-50"
      :disabled="submitting"
    >
      {{ submitting ? '提交中...' : '提交评论' }}
    </button>
  </form>
</template>
单个列表项:
          <script setup lang="ts">
import type { CommentResponseDto } from '~~/cloudflare-d1/db/dto/comment.dto'

defineProps<{
  comment: CommentResponseDto
}>()

const emit = defineEmits<{
  refresh: []
}>()

const showReplyEditor = ref(false)

function handleReplySuccess() {
  showReplyEditor.value = false
  emit('refresh')
}
</script>

<template>
  <div aria-label="comment-item" class="my-2">
    <div class="flex items-start gap-4">
      <!-- 头像 -->
      <div class="w-10 h-10 rounded-full bg-gray-200 dark:bg-gray-700 overflow-hidden">
        <img
          :src="`https://www.gravatar.com/avatar/${comment.email}?d=mp`"
          :alt="comment.author"
          class="w-full h-full object-cover"
        >
      </div>

      <div class="flex-1">
        <!-- 评论头部 -->
        <div class="flex items-center gap-2 mb-1">
          <span class="text-sm font-medium opacity-80">{{ comment.author }}</span>
          <span class="text-xs opacity-40">
            {{ new Date(comment.createdAt).toLocaleString() }}
          </span>
        </div>

        <!-- 评论内容 -->
        <div class="max-w-none">
          <div
            class="
              w-fit h-9 bg-app-hover
              px-3 py-2 text-sm
              rounded-xl rounded-tl-sm
              flex items-center gap-2
            "
          >
            <template v-if="comment.replyTo">
              <span class="text-blue-500">
                @{{ comment.replyTo.author }}
              </span>
              {{ comment.content }}
            </template>
            <template v-else>
              {{ comment.content }}
            </template>
          </div>
        </div>

        <!-- 评论操作 -->
        <div class="flex items-center gap-4 mt-2 text-xs">
          <button
            class="text-gray-500 hover:text-gray-700 dark:hover:text-gray-300"
            @click="showReplyEditor = !showReplyEditor"
          >
            回复
          </button>
        </div>

        <!-- 回复编辑器 -->
        <CommentEditor
          v-if="showReplyEditor"
          :post-id="comment.postId"
          :parent-id="comment.id"
          class="mt-4"
          @success="handleReplySuccess"
        />
      </div>
    </div>
  </div>
</template>